文章目录
  1. 1. 单日期组件
    1. 1.1. 基本思路
    2. 1.2. selectDate.derective.ts
    3. 1.3. selectDate.template.html
  2. 2. 双日期(时间)组件
    1. 2.1. 基本思路
    2. 2.2. selectDateInterval.directive.ts
    3. 2.3. 日期组件的使用和展示
  3. 3. 结束语

AngularJS(v1.5.8)已经成为项目们的基本框架,《玩转Angular1》系列用于记录项目中的一些好玩或者比较特别的思路。
上一节我们讲了一些组件的设计思想,这里我们就按照其中的一些思想,创建一个日期的组件。

单日期组件


基本思路

作为一个单日期组件,需要支持以下功能:

  • 维护最早可选日期、最晚可选日期,这些数据可初始化传入
  • 可下拉展示、失焦关闭
  • 可翻,前后一个月、前后一年
  • 可选中日期,该数据可初始化传入
  • 日历需显示星期几,则需要处理当月第一天为星期几
  • 显示当月天数

关于失焦处理,前面也提及过通过组件进行处理,请移步《玩转Angular1(10)–使用Directive指令来添加事件监听》
至于其他,我们遵循上一节《玩转Angular1(11)–组件的自我修养》讲到的一些组件设计的思想:

  • 日期组件对外提供最少状态数据,包括:最早可选日期、最晚可选日期、选中日期,未选择时显示内容(可选),选择后回调(可选)
  • 日期组件维护自身的事件,包括:下拉展示、失焦关闭、前后一个月、前后一年、选中日期
  • 日期组件对外提供选中回调,并传入选中日期

selectDate.derective.ts

1
2
3
4
5
6
7
8
9
10
11
12
13
14
15
16
17
18
19
20
21
22
23
24
25
26
27
28
29
30
31
32
33
34
35
36
37
38
39
40
41
42
43
44
45
46
47
48
49
50
51
52
53
54
55
56
57
58
59
60
61
62
63
64
65
66
67
68
69
70
71
72
73
74
75
76
77
78
79
80
81
82
83
84
85
86
87
88
89
90
91
92
93
94
95
96
97
98
99
100
101
102
103
104
105
106
107
108
109
110
111
112
113
114
115
116
117
118
119
120
121
122
123
124
125
126
127
128
129
130
131
132
133
134
135
136
137
138
139
140
141
142
143
144
145
146
147
148
149
150
151
152
153
154
155
// app/shared/components/selectDate.derective.ts
export default (ngModule) => {
/*
* @ 日期筛选组件
* @param: {
* data: {
* beginDate: string?, // 开始日期
* endDate: string?, // 结束日期
* chosenDate: string?, // 选中日期
* },
* text: string, // 未选择日期时显示
* chosen: function, // 选中日期后回调(传入选中日期:xxxx-xx-xx)
* }
*
*/
ngModule.directive('selectDate', function () {
return {
restrict: 'AE',
scope: {
data: '=?',
chosen: '=?',
text: '@?'
},
templateUrl: './shared/components/selectDate.template.html',
transclude: true,
replace: false,
link(scope, element, attrs) {
const dateNow = new Date();
const todate = `${dateNow.getFullYear()}-${dateNow.getMonth() + 1}-${dateNow.getDate()}`;
let beginDate;
let endDate;
scope.isShown = false;
scope.toggle = toggle;
scope.init = init;
scope.chooseDay = chooseDay;
scope.lastMonth = lastMonth;
scope.nextMonth = nextMonth;
scope.lastYear = lastYear;
scope.nextYear = nextYear;
scope.isDayChosen = isDayChosen;
scope.isDayActive = isDayActive;
// 下拉/收起日期组件
function toggle() {
scope.isShown = !scope.isShown;
}
// 初始化事件
function init() {
if(!scope.data) {scope.data = {};}
scope.chosenDate = scope.data && scope.data.chosenDate || todate;
beginDate = scope.data && scope.data.beginDate || '1700-01-01';
endDate = scope.data && scope.data.endDate || '2900-12-30';
render();
}
// 刷新日历事件
function render(date?) {
scope.readingDate = FormatDate(date || scope.data.chosenDate || todate);
const year = Number(scope.readingDate.split('-')[0]);
const month = Number(scope.readingDate.split('-')[1]);
const firstday = getFirstDay(year, month);
const monthlength = getMonthLength(year, month);
// readingDays保存当前月份的日期数组
scope.readingDays = [];
// 传入''则为空,用于星期对齐
for (let i = 0; i < firstday; i++) {
scope.readingDays.push('');
}
// 传入当前月份日期
for (let i = 1; i <= monthlength; i++) {
scope.readingDays.push(i);
}
}
// 选中日期事件
function chooseDay(day){
const {year, month} = getDateDetail(scope.readingDate);
scope.chosenDate = scope.data.chosenDate = `${year}-${month}-${day}`;
scope.isShown = false;
if (typeof scope.chosen === 'function') {
scope.chosen(scope.chosenDate);
}
}
// 选择上一个月份日期
function lastMonth() {
let {year, month, day} = getDateDetail(scope.readingDate);
if (--month === 0) {
render(`${year - 1}-12-${day}`);
} else {
render(`${year}-${month}-${day}`);
}
}
// 选择下一个月份日期
function nextMonth() {
let {year, month, day} = getDateDetail(scope.readingDate);
if (++month > 12) {
render(`${year + 1}-1-${day}`);
} else {
render(`${year}-${month}-${day}`);
}
}
// 选择上一年日期
function lastYear() {
let {year, month, day} = getDateDetail(scope.readingDate);
render(`${year - 1}-${month}-${day}`);
}
// 选择下一年日期
function nextYear() {
let {year, month, day} = getDateDetail(scope.readingDate);
render(`${year + 1}-${month}-${day}`);
}
// 判断日期是否当前选中日期
function isDayChosen(day) {
if (!day) { return false; }
const {year, month} = getDateDetail(scope.readingDate);
return FormatDate(`${year}-${month}-${day}`) === FormatDate(scope.chosenDate);
}
// 判断当前日期是否有效日期
function isDayActive(day) {
if (!day) { return false; }
const {year, month} = getDateDetail(scope.readingDate);
const date = FormatDate(`${year}-${month}-${day}`);
return (date >= FormatDate(beginDate) && date <= FormatDate(endDate));
}
// 获取当月第一天星期几
function getFirstDay(year, month) {
return new Date(year, month - 1, 1).getDay();
}
// 获取当月天数
function getMonthLength(year, month) {
const nextMonth = new Date(year, month, 1);
nextMonth.setHours(nextMonth.getHours() - 2);
return nextMonth.getDate();
}
// 获取当前查看日期的年月日
function getDateDetail(date) {
let year = Number(scope.readingDate.split('-')[0]);
let month = Number(scope.readingDate.split('-')[1]);
let day = Number(scope.readingDate.split('-')[2]);
return { year, month, day };
}
},
};
});
};
selectDate.template.html

1
2
3
4
5
6
7
8
9
10
11
12
13
14
15
16
17
18
19
20
21
22
23
24
25
26
27
28
29
<!--app/shared/components/selectDate.template.html-->
<div select="select" on-focus-lost="isShown = false">
<p ng-click="init();toggle();" ng-class="isShown ? 'active' : ''"><span class="btn-calendar-icon"></span>{{ (data && data.chosenDate | date) || text || '请选择日期' }}</p>
<aside class="calendar">
<header>
<p>{{ readingDate.split('-')[0] }}年</p>
<a class="next-year" ng-click="nextYear()"><i class="fa fa-angle-double-right"></i></a>
<a class="next-month" ng-click="nextMonth()"><i class="fa fa-angle-right"></i></a>
<!-- <a class="today" ng-click="render(yC,mC,dC)"></a> -->
<p class="month">{{ readingDate.split('-')[1] | number }}月</p>
<a class="last-month" ng-click="lastMonth()"><i class="fa fa-angle-left"></i></a>
<a class="last-year" ng-click="lastYear()"><i class="fa fa-angle-double-left"></i></a>
</header>
<section>
<aside>
<p></p>
<p></p>
<p></p>
<p></p>
<p></p>
<p></p>
<p></p>
</aside>
<article>
<p ng-repeat="day in readingDays" ng-class="isDayChosen(day) ? 'chosen' : isDayActive(day) ? 'active' : ''" ng-click="(isDayActive(day) || isDayChosen(day)) ? chooseDay(day) : ''">{{ day }}</p>
</article>
</section>
</aside>
</div>

其中,[on-focus-lost]组件则前面我们说到的,用于失焦处理。

双日期(时间)组件


基本思路

有些时候,我们的日期是成对出现的,即选择一个时间段,此时我们需要维护两个日期组件间的关系:

  • 开始日期的选择,将影响结束日期的最早可选时间
  • 结束日期的选择,将影响开始日期的最晚可选时间

作为一个双日期组件,需要支持以下功能:

  • 维护最早可选日期、最晚可选日期
  • 基本的单个日期组件的功能
  • 可选中开始日期和结束日期,该数据可初始化传入
  • 开始日期和结束日期的约束关系

而很多时候,我们的日期和时间也是匹配出现的,此时则为[开始日期][开始时间]-[结束日期][结束时间]的方式出现。

我们涉及的一些组件设计的思想:

  • 日期组件对外提供最少状态数据,包括:最早可选日期、最晚可选日期、选中日期(开始、结束),未选择时显示内容(开始、结束)(可选)
  • 日期组件维护自身的事件
  • 日期组件对外提供选中回调,并传入选中日期或者时间
  • 日期组件通过配置选项,来确定是否显示时间

这里的时间组件,也是一个封装好的组件,我们在这不进行详细说明了,有兴趣的小伙伴可以去看看。

selectDateInterval.directive.ts

1
2
3
4
5
6
7
8
9
10
11
12
13
14
15
16
17
18
19
20
21
22
23
24
25
26
27
28
29
30
31
32
33
34
35
36
37
38
39
40
41
42
43
44
45
46
47
48
49
50
51
52
53
54
55
56
57
58
59
60
61
62
63
64
65
66
67
68
69
70
71
72
73
74
75
76
77
78
79
80
81
82
83
84
85
86
87
88
89
90
91
92
93
94
95
96
97
98
99
100
101
102
103
104
105
106
107
108
109
110
111
export default (ngModule) => {
/*
* @ 日期(时间)间断筛选组件
* @param: {
* data: {
* beginDate: string?, // 开始日期
* endDate: string?, // 结束日期
* chosenBeginDate: string?, // 选中开始日期
* chosenEndDate: string?, // 选中结束日期
* beginTime: string? // 开始时间
* endTime: string? // 结束时间
* },
* beginText: string?, // 未选择开始日期时显示
* endText: string?, // 未选择结束日期时显示
* withTime: string? // 是否有时间控件,传入任何值均为是
* chosen: function, // 选中日期后回调(传入选中数据:[data, dataType], dataType有四种:'beginData', 'endData', 'beginTime', 'endTime')
* }
*
*/
ngModule.directive('selectDateInterval', function () {
return {
restrict: 'AE',
scope: {
data: '=?',
chosen: '=?',
beginText: '@?',
endText: '@?',
withTime: '@?',
},
template: `
<div>
<div select-date data="beginData" class="inline-block" text="{{ data && data.chosenBeginDate || beginText || '开始日期' }}" chosen="chooseBeginDate"></div>
<div ng-if="withTime" select-time class="inline-block" type="begin" chosen="chooseTime" selected="beginTime"></div>
<span class="bold-vertical-line inline-block"></span>
<div select-date data="endData" class="inline-block" text="{{ data && data.chosenEndDate || endText || '结束日期' }}" chosen="chooseEndDate"></div>
<div ng-if="withTime" select-time class="inline-block" type="end" chosen="chooseTime" selected="endTime"></div>
</div>
`,
transclude: true,
replace: true,
link(scope, element, attrs) {
const dateNow = new Date();
const todate = `${dateNow.getFullYear()}-${dateNow.getMonth() + 1}-${dateNow.getDate()}`;
scope.data = {};
scope.beginData = {};
scope.endData = {};
scope.init = init;
scope.chooseBeginDate = chooseBeginDate;
scope.chooseEndDate = chooseEndDate;
scope.chooseTime = chooseTime;
// 初始化事件
function init() {
scope.withTime = !!scope.withTime;
scope.beginData = {
beginDate: scope.data && scope.data.beginDate,
endDate: scope.data && scope.data.endDate,
chosenDate: scope.data && scope.data.chosenBeginDate
};
scope.endData = {
beginDate: scope.data && scope.data.beginDate,
endDate: scope.data && scope.data.endDate,
chosenDate: scope.data && scope.data.chosenEndDate
}
if(scope.withTime){
scope.beginTime = scope.data && scope.data.beginTime || '00:00:00';
scope.endTime = scope.data && scope.data.endTime || '23:59:59';
}
}
// 选择开始日期事件
function chooseBeginDate(date) {
scope.data.chosenBeginDate = date;
scope.endData = {...scope.endData, beginDate: date};
if (typeof scope.chosen === 'function') {
scope.chosen(date, 'beginDate');
}
}
// 选择结束日期事件
function chooseEndDate(date) {
scope.data.chosenEndDate = date;
scope.beginData = {...scope.beginData, endDate: date};
if (typeof scope.chosen === 'function') {
scope.chosen(date, 'endDate');
}
}
// 选择时间事件
function chooseTime(time, type) {
if(type === 'begin'){
scope.data.beginTime = scope.beginTime = time;
}else if(type === 'end'){
scope.data.endTime = scope.endTime = time;
}
if (typeof scope.chosen === 'function') {
scope.chosen(time, `${type}Time`);
}
}
// 监听data进行初始化
scope.$watch('data', (n,o)=>{
if(n !== undefined){
scope.data = n;
init();
}
})
},
};
});
};

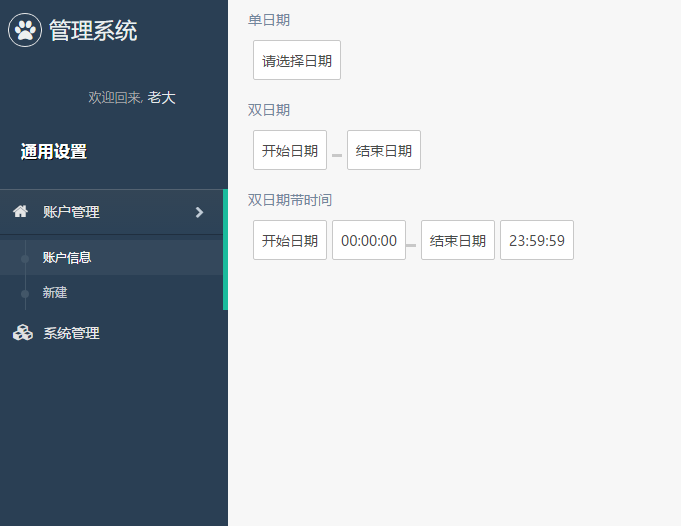
日期组件的使用和展示

我们将在账户管理模块,简单地展示一下我们的日期组件,当然我们需要添加控制器:

  • account.controller.ts
1
2
3
4
5
6
7
8
9
10
11
12
13
14
15
16
17
18
19
20
21
22
// app/modules/home/account/account.controller.ts
class AccountCtrl {
// 获取依赖
public static $inject = [
'$scope',
];
// 注入依赖
constructor(
private $scope
) {
// VM用于绑定模板相关内容
$scope.VM = this;
}
chosen(date){Notify({title: `选中${date}`});}
chosenInterval(date, dateType){Notify({title: `选中${dateType},为${date}`});}
}
export default (ngModule) => {
ngModule.controller('AccountCtrl', AccountCtrl);
};
  • account.template.html
1
2
3
4
5
6
7
8
9
10
11
<div>
<p>单日期
<div select-date chosen="VM.chosen"></div>
</p>
<p>双日期
<div select-date-interval chosen="VM.chosenInterval"></div>
</p>
<p>双日期带时间
<div select-date-interval with-time="yes" chosen="VM.chosenInterval"></div>
</p>
</div>

image

结束语


这节主要简单日期组件的创建,以及一些设计思想。其实把组件做成可配置,这样的想法也是很棒的,多亏了团队的小朋友们,发散的思维给大家都带来了很棒的收获呢。
此处查看项目代码
此处查看页面效果

查看Github有更多内容噢:https://github.com/godbasin
更欢迎来被删的前端游乐场边撸猫边学前端噢

码生艰难,写文不易,给我家猪囤点猫粮了喵~

作者:被删

出处:https://godbasin.github.io

本文版权归作者所有,欢迎转载,但未经作者同意必须保留此段声明,且在文章页面明显位置给出原文连接,否则保留追究法律责任的权利。

文章目录
  1. 1. 单日期组件
    1. 1.1. 基本思路
    2. 1.2. selectDate.derective.ts
    3. 1.3. selectDate.template.html
  2. 2. 双日期(时间)组件
    1. 2.1. 基本思路
    2. 2.2. selectDateInterval.directive.ts
    3. 2.3. 日期组件的使用和展示
  3. 3. 结束语