AngularJS(v1.5.8)已经成为项目们的基本框架,《玩转Angular1》系列用于记录项目中的一些好玩或者比较特别的思路。
本文记录在angular中封装上传本地图片服务,以及异步提交表单(包括图片)服务的过程。
上传本地图片
添加OpenImageDialog函数
我们在app/shared/services文件夹下新建OpenImageDialog.ts文件。
这里我们只创建最简单的功能,如打开图片对话框,并只接受一张图片上传,该函数返回一个Promise,其中resolve可获取参数包括:
- file: 上传文件
- url: 图片url,可用于展示
- name: 图片名字,从文件中获取
1 2 3 4 5 6 7 8 9 10 11 12 13 14 15 16 17 18 19 20 21 22 23 24 25 26 27 28 29 30 31 32 33 34
| export function OpenImageDialog() { const input = document.createElement('input'); input.type = 'file'; input.name = 'file'; input.accept = 'image/*'; let resolve; const promise = new Promise((res, rej) => { resolve = res; }); input.onchange = () => { const fileReader = new FileReader(); const file = input.files[0]; fileReader.onload = () => { resolve({ file, url: fileReader.result, name: input.value.substring(input.value.lastIndexOf('\\') + 1) }); }; fileReader.readAsDataURL(file); }; input.click(); return promise; }
|
在创建账户中使用该服务
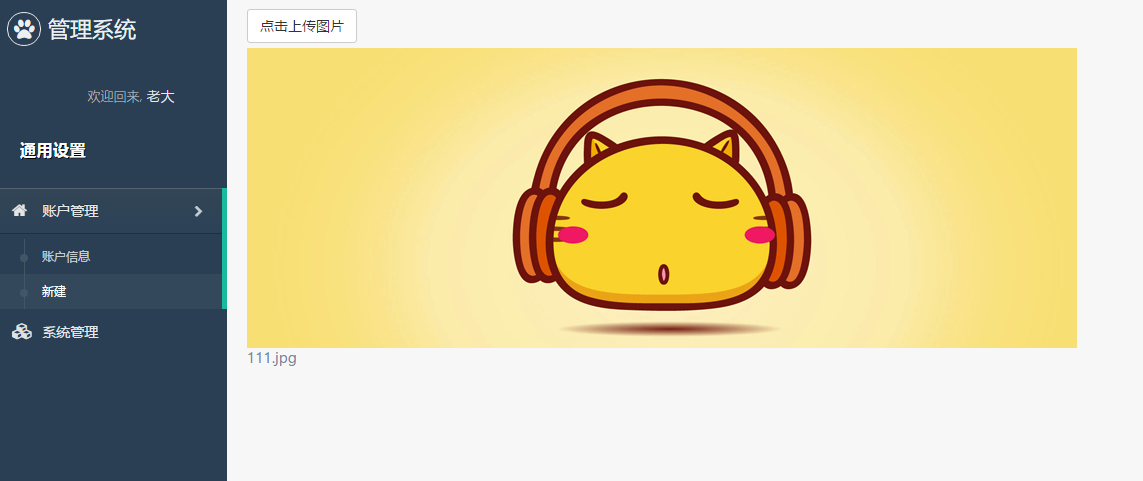
上一节中,我们创建了一些相关路由以及视图,其中包括一个创建账户模块,这里我们在该模块中添加点击上传图片按钮,并展示图片以及名字。
1 2 3 4 5 6 7 8 9
| <div> <a class="btn btn-default" ng-click="VM.openImageDialog()">点击上传图片</a> <div ng-repeat="image in VM.images"> <img ng-src="{{ image.url }}" /> <p>{{ image.name }}</p> </div> </div>
|
然后我们添加文件accountAdd.controller.ts,并创建一个控制器AccountAddCtrl:
1 2 3 4 5 6 7 8 9 10 11 12 13 14 15 16 17 18 19 20 21 22 23 24 25 26 27 28 29 30 31 32 33 34
| import { OpenImageDialog } from '../../../shared/services/OpenImageDialog'; const angular = require('angular'); class AccountAddCtrl { public static $inject = [ '$scope' ]; images: any[] = []; constructor( private $scope ) { $scope.VM = this; } openImageDialog() { OpenImageDialog().then(({file, url, name}) => { this.images.push({ url, name }); this.$scope.$digest(); }); } } export default (ngModule) => { ngModule.controller('AccountAddCtrl', AccountAddCtrl); };
|
最后,我们注册控制器,并在路由中关联模板和控制器。
1 2 3 4 5 6
| import AccountAddCtrl from './modules/home/account/accountAdd.controller'; [ ... AccountAddCtrl ].forEach((service) => service(ngModule));
|
1 2 3 4 5 6 7 8
| ... { name: 'home.accountsadd', url: '/accountsadd', templateUrl: './modules/home/account/accountAdd.template.html', controller: 'AccountAddCtrl' }
|
效果如图:

异步表单提交
我们在这里创建个服务,用于异步提交表单,这里我们需要注入前面提到的qHttp服务。
该组件是方便与OpenImageDialog服一起使用,由于需要注入angular服务,所以我们需要在ngModele中进行注册,而OpenImageDialog服务则不需要。
AsyncForm服务调用时,可传入对象:
- files: 传入file input的dom对象
- url: 服务器地址
- params: 其他需要发送的参数{键:值}
1 2 3 4 5 6 7 8 9 10 11 12 13 14 15 16 17 18 19 20 21 22 23 24 25 26 27 28 29 30 31 32 33 34 35 36 37 38 39 40 41 42 43 44 45 46 47 48
| class AsyncForm { url: string; qHttp: TODO; contentType: TODO; formData: TODO; constructor(qHttp, { url, params, files = [], contentType }) { this.qHttp = qHttp; this.url = url; this.contentType = contentType; const formData = new FormData(); this.formData = formData; if (files) { Array.prototype.forEach.call(files, file => { formData.append('file', file); }); } Object.keys(params).forEach(key => { if (params[key] != null) { formData.append(key, params[key]); } }); } submit() { return this.qHttp.post(this.url, this.formData, { withCredentials: true, headers: { 'Content-Type': undefined }, transformRequest: x => x }); } } export default (ngModule) => { ngModule.factory('AsyncForm', ['qHttp', function (qHttp) { return config => new AsyncForm(qHttp, config).submit(); }]); };
|
当然我们还需要在bootstrap.ts文件中注册该服务,这里就不详细讲解啦。
配合OpenImageDialog服务使用
AsyncForm服务配合OpenImageDialog服务使用,可实现较连贯的图片上传,或者异步表单提交。
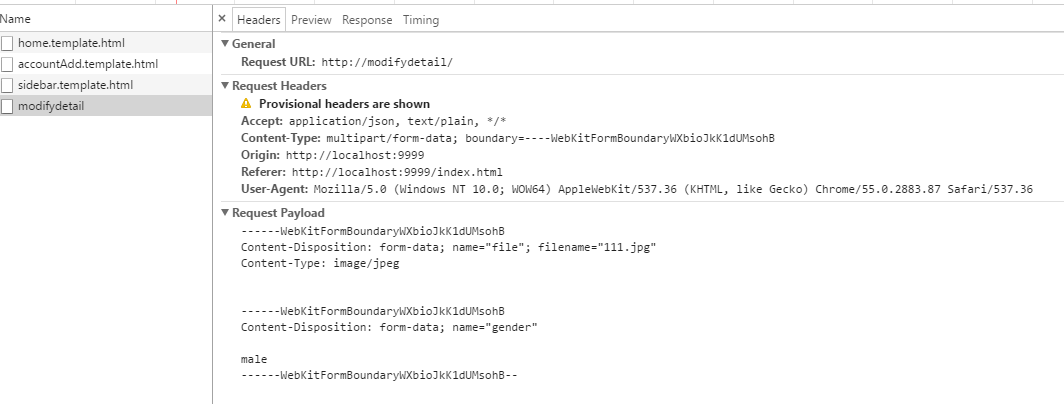
这里我们在上面上传图片后,调用AsyncForm服务进行表单提交,当然我们还需要注入该服务:
1 2 3 4 5 6 7 8 9 10 11 12 13 14 15 16 17 18 19 20 21 22 23 24 25 26 27 28 29 30 31 32
| class AccountAddCtrl { public static $inject = [ ... 'AsyncForm' ]; ... constructor( ... private AsyncForm ) {...} openImageDialog() { OpenImageDialog().then(({file, url, name}) => { this.images.push({ url, name }); this.$scope.$digest(); this.AsyncForm({ files: [file], url: 'http://modifyDetail', params: { gender: 'male' } }).then(()=>{console.log('success')}, () =>{console.log('error')}) }); } }
|
效果如图:

这样,我们就实现了在angular中封装图片上传,并经过$http服务进行异步表单提交的功能了。
结束语
这节主要简单介绍了在angular中封装上传本地图片服务,以及异步提交表单(包括图片)服务的过程。当然,大家也可以在这个基础上进行拓展,把服务灵活处理,接受图片或者其他文件,单个或者多个文件,等等功能。
此处查看项目代码
此处查看页面效果
查看Github有更多内容噢:https://github.com/godbasin
更欢迎来被删的前端游乐场边撸猫边学前端噢


